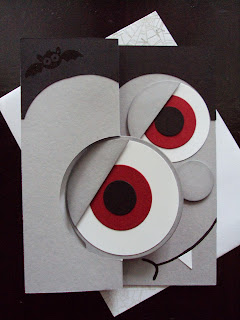
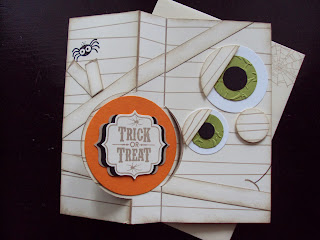
I will give a list of supplies used at the end of the picture set. All supplies for the following cards are from Stampin Up. With all of these guys I cut a piece of paper 5 7/8 x 8 1/2 with that I have enough extra for the eyelids and the nose.
Monster Mash
For her eyelashes I used a circle punch and kept punching slivers off.
I used a Crumb Cake marker and a ruler and drew uneven lines all over the paper, I then took 2 (3/4 in) strips and inked the edge and glued them down. The trick to this mummy is that you have to put the Thinlit Frame on the blank side with the side with lines down, if not it won't fold the way you need it to. I hope this clarifies any questions on this guy he is a real cutie.
- Whisper White, Wisteria Wonder,,Basic Black, Smokey Slate, Lucky Limeade, Crumb Cake, Pumpkin Pie,Cherry Cobbler and Very Vanilla card stock.
- Basic Black, Crumb Cake, Smokey Slate, Lucky Limeade, and Cherry Cobbler Ink. & markers.
- Black Embossing Powder & VersaMark.
- Thinlits Circke Card, Various size Circles & Ovals, Label Bracket Punch.
- Stamp Sets Googly Ghouls, Tags 4 You, and Monster Munchies.
This was so much fun and I think that the possibilities are endless, one of my new favorites.
Thanks as always for stopping by and go crazy with your crafting.
Follow Me on Pinterest.


These are the cutest cards I have ever seen! I love it!!
ReplyDeleteThank You so much I will be posting different seasons and characters as I can think of them. This is one of my favorite things Stampin Up has ever sold so versatile.
DeleteCan I ask...On the mummy cards, are those actually strips of paper that are then layered on? Or are the lines drawn on? What technique did you use to blur the edges of the strips?
ReplyDeleteThanks for any advice!
I actually drew all the lines on the card with Crumb Cake trying to stagger them randomly, and the took two 3/4 in strips and inked the edges and taped them down before I cut out the Mummy the trick is also to put the thinlit on the reverse side with no lines when cutting so it folds the correct way for the eyes. Hope this helps if you really want step by step shots I guess I could do that. Thanks so much for all the interest.
DeleteThese are REALLY cute!!! Nice job :)
ReplyDeleteAmazing, AMAZING, AMAZING!!!!! WOW what a clever idea lovely lady!! Might give one a go for a Christmas person! Thanks heaps!
ReplyDeleteSmiles Sharnee :)
Very cute cards!
ReplyDeleteThese are super cute!I feel so dumb I have no clue how you made them? Any video or more instructions to make them? I would love to make some! Thank you!!!
ReplyDeleteDo you have any instructions for these?? Thanks
ReplyDeleteI truly just used the Stampin Up thinlit die and different size circle dies from 2 1/2inches to 3/4 of an inch for eyes. For the hair on frank I just randomly cut out triangles of sort and for dracula I used the 2 1/2inch circle punch .
DeleteThank you. How did you make the card itself? not sure how you made it and has a circle bult in it? Is that what the stampin up thinlit die is? Sorry for the dumbness. Thanks, Sherry
ReplyDeleteI love all! So wunderful! Thanks for advice! Many Greetings Geli
ReplyDeleteSherry it was a stampin up product. It has the cut out built in
ReplyDeleteI don't do much for Halloween but you are one smart cookie. Thnaks for sharing.
ReplyDeleteany chance of a step by step, I am new to this and need help to stay inspired. Love all of them, thanks
ReplyDeleteAt what measurements are the score line marks? Very cute!
ReplyDeleteI would love to know the scoring measurements as well... just love these want to send to grandkids :)
DeleteI'd also love a full tutorial so those of us not in the SU! world can play too! TIA!
DeleteOOh! These cards are just fabulous!!!
ReplyDeleteFound you on pinterest and following
ReplyDeleteThat card is so cute. I’m still trying to figure out how exactly did it but it looks like one of those that when you open it up party part of it turns. I explain that a little bit to simply but hopefully you know what I mean
ReplyDelete